If you suspect that you have spyware installed on your computer, then an excellent tool to remove them is Ad-Aware SE. Follow the instructions below to learn how to use Ad-Aware SE to remove these programs from your computer. Word of warning, though, Spyware can sometimes be integrated tightly into software that you use, and if you remove the spyware, that software may not function correctly. So be careful as to what you remove.
If you would like to learn more about Spyware and Browser Hijackers you can click here:
Understanding Spyware and Browser Hijackers
How to use Ad-Aware SE
Step 1: Download Ad-Aware SE
The first step for Spyware/Hijacker removal is to download and install Ad-Aware SE from the link below. After it is installed, continue with the following steps.
Note: There may at times be programs listed above in the Google ads that seem similar to the programs we recommend. These are usually not the same program. Bleeping Computer has no real say as to what appears there and can not vouch for any of those programs. Please use only the programs directed to you by us in the forums or via these tutorials.
Please download Ad-Aware SE from Lavasoft at the following link: Download Link for Lavasoft Ad-Aware SE
Download this program to a location on your hard drive that you will be able to find later. When the download is finished navigate to that location using Windows Explorer or My Computer, and double click on the file name. The file name generally starts with aawse.exe. For example for the current version of Ad-Aware SE Personal, the filename is aawsepersonal.exe. Follow the defaults settings when presented with options and after the program finishes installing you will be presented with a screen similar to the one below:
Figure 1: Options after finished installed
Uncheck all options as we will have you manually do each of these steps in the next section. Then press the Finish button.
Step 2: Start Ad-aware SE
On your desktop, double click on the icon for Ad-Aware SE.
The program will open and it will appear as in Figure 2 below.
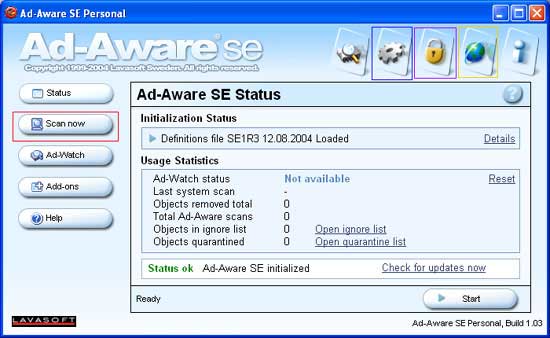
Figure 2. Ad-Aware SE Starting/Status Screen
This is the main startup/status screen for Ad-Aware SE. Each section that is important for it's use has been boxed off with a different color. The red box around the Scan Now button is used when you want to scan your computer for Spyware/Hijackers. The blue box lets you get into the options screen for Ad-aware SE. The purple box is where you would click to see what Spyware/Hijackers have been quarantined. The yellow box is used to update the malware database that the program knows how to clean.
Step 3. Updating Ad-aware
The first step you should do is update Ad-Aware SE so it is using the latest Spyware/Hijacker definitions. This will enable the software to recognize as much of these types of programs that it can. You should click on the WebUpdate button highlighted, in the previous image, in yellow to start the update process. When you start the process you should see an image similar to Figure 3 below.
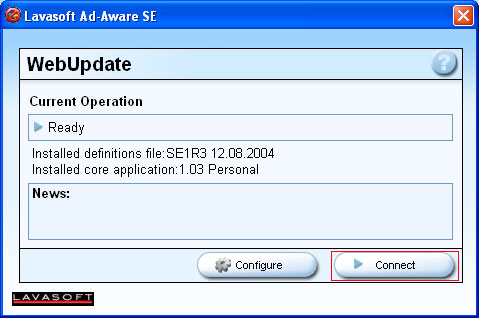
Figure 3. Starting WebUpdate
Now press on the connect button, designated by the red box in Figure 3, and it will check for any new updates. If no new updates are to be found you will see something like Figure 4 below. You should press OK and proceed to Step 4.

Figure 4. No Update Found
If an update is found you will see something like in Figure 5 below:
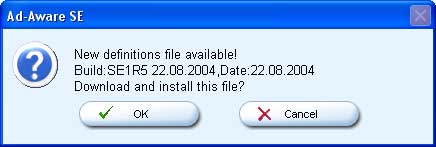
Figure 5. Update Found
You should click once on the OK button and let it download the update. When it is done downloading the update you will be presented with a screen similar to Figure 6 below.
Figure 6. Updating has Finished
You can now click on the Finish button. When you do that you will be presented with the Status/Startup screen as shown in Figure 2.
Step 4: Set the scan options we want to use
Now that Ad-Aware SE is updated with the latest definitions, you are now ready to configure Ad-Aware SE to use optimal settings. First click on the Configuration button at the top of the window, designated by the blue box in Figure 1 that looks like a gear. You will now be presented with a new screen with various options to set. Please follow these instructions to configure Ad-Aware SE:
- Click on the General button on the left hand side.
- Make sure the following items under the Safety category have a green check in them. If they do not, click once on the circle next to them to put a checkmark in it.
- Automatically save logfile
- Automatically quarantine objects prior to removal
- Safe Mode (always request confirmation)
- Make sure the following items under the Safety category have a green check in them. If they do not, click once on the circle next to them to put a checkmark in it.
- Next click on the Advanced button on the left hand side.
- Make sure the following items under the Logfile Detail Level category have a green check in them. If they do not, click once on the circle next to them to put a checkmark in it.
- Include additional object information
- Include negligible objects information
- Include environment information
- Include Alternate data stream details in log file
- Make sure the following items under the Logfile Detail Level category have a green check in them. If they do not, click once on the circle next to them to put a checkmark in it.
- Next click on the Tweak button on the left hand side.
- Then click on the + (plus) sign next to the Log Files section. This will expand the section. Make sure the following items under the Logfile Detail Level category have a green check in them. If they do not, click once on the circle next to them to put a checkmark in it.
- Include basic Ad-Aware settings in logfile
- Include additional Ad-Aware settings in logfile
- Then click on the + (plus) sign next to the Scanning Engine section. This will expand the section. Make sure the following items under the Logfile Detail Level category have a green check in them. If they do not, click once on the circle next to them to put a checkmark in it.
- Unload recognized processes & modules during scan
- Scan registry for all users instead of current user only
- Then click on the + (plus) sign next to the Cleaning Engine section. This will expand the section. Make sure the following items under the Logfile Detail Level category have a green check in them. If they do not, click once on the circle next to them to put a checkmark in it.
- Always try to unload modules before deletion
- During removal, unload Explorer and IE if necessary
- Let Windows remove files in use at next reboot
- Delete quarantined objects after restoring
- Then click on the + (plus) sign next to the Log Files section. This will expand the section. Make sure the following items under the Logfile Detail Level category have a green check in them. If they do not, click once on the circle next to them to put a checkmark in it.
Once these settings have been completed, you should click on the Proceed button. This will bring you to the preparation screen as show in Figure 7 below.
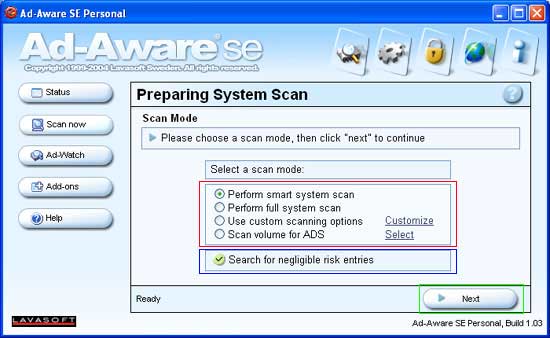
Figure 7. System Scan Preparation
Make sure you change the scan mode, designated by the red box in the figure above, to Perform full system scan. Then uncheck the Search for negligible risk entries.
Step 5: Start the Actual Scan
Now click on the Next button to have Ad-Aware SE start scanning your system. Ad-Aware SE will start scanning your system for Spyware and Hijackers. This could take a while, so you may want to do something else and come back and check on it occasionally. The screen will look similar to Figure 8 below.
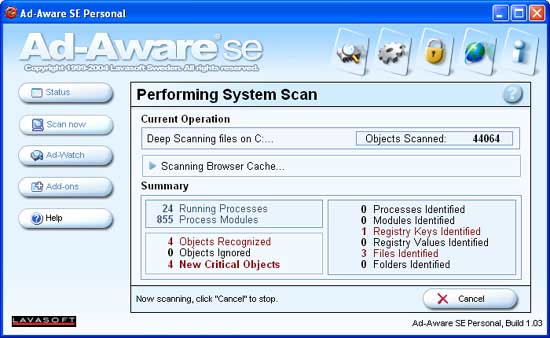
Figure 8: Scanning your computer
Ad-Aware SE will scan various portions of your computer's configuration, file system, and memory for traces of known malware. As it finds infections, it will update the status of the scan with the amount of items it has found and what it is currently scanning. When it is finished scanning you will be presented with a screen similar to Figure 9 below.
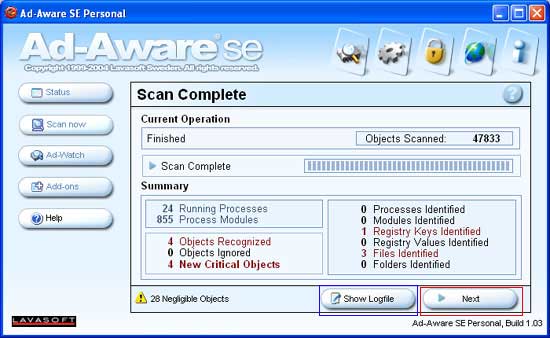
Figure 9. Finished with the Scan
This computer has relatively few infections as you can by the fact that it found only 4 items. If you want to copy the contents of the scan log, you can click on the Show Logfile button, designated by the blue box in the figure above, to open the log file and copy and paste it into another program. To finish the clean up you should now click on the Next button designated by the red box in Figure 9. You will then be presented with a screen that shows all the objects found that are flagged as Spyware or Hijackers as shown in Figure 10 below.
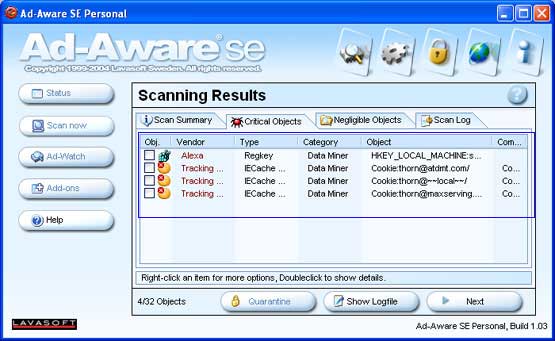
Figure 10: Scan Results
At this point you should either right click on the screen and choose the Select All Objects option or individually put a checkmark in each objects checkbox, designated by the area surrounded by the red box in Figure 10, that you would like quarantined. When all the objects that you would like quarantined are checked, you should click on the Next button. Ad-Aware SE will now present you with a confirmation box as to whether or not you would like to remove the objects you have just selected. If you would like to do so, press the OK button, otherwise press the Cancel button to go back to the selection screen shown in Figure 10. If you press the OK button, Ad-Aware SE will move all the selected items into the quarantine.
When it is done putting all the checked items into quarantine, you will be presented with the Startup/Status Screen again as shown in Figure 11.
Step 5: Cleaning up the Quarantine
With the moving of the select objects to the quarantine now completed you will be presented with a screen like Figure 11 below. As was said before, when you fix items with Ad-Aware SE it does not automatically delete them, but adds them to a quarantine file that takes up hard drive space. Therefore it is not a bad idea to get rid of them. Before you do so, though, it is good to use your computer for some time to make sure any of the items you have quarantined did not break functionality of any programs that you need to use. If you find that it has caused no problems, then you should continue.
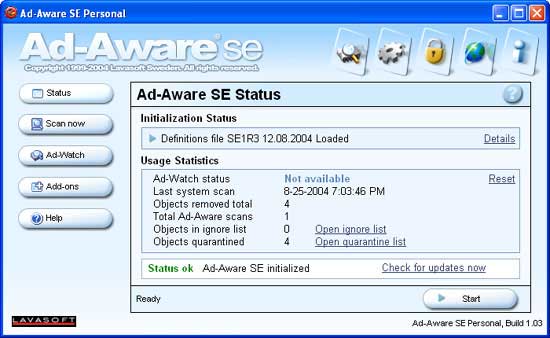
Figure 11. Status Screen
As you can see you now have all of the items you checked off in your quarantine. To access this quarantine you should click on the link that says "Open Quarantine List". This will present you with an image like Figure 12 below.

Figure 12. Quarantine Management
At this point you should select the quarantine file that you would like to delete and press the delete key. The quarantine file is now deleted off your hard drive. When you are done deleting your quarantine files, you can exit the program.
Conclusion
Now that you know how to use Ad-Aware SE you now have another tool at your disposal to combat the growing threat of Spyware and Hijackers.
As always if you have any questions or comments..

0 comments: